Bose Video Wave 46 VIDEOWAVE 2 User Manual Page 1
Browse online or download User Manual for Power extensions Bose Video Wave 46 VIDEOWAVE 2. Bose Video Wave 46 VIDEOWAVE 2 User's Manual
- Page / 40
- Table of contents
- TROUBLESHOOTING
- BOOKMARKS
- Operating Guide 1
- Guía del usuario 1
- Guide d’utilisation 1
- NTERTAINMENT 1
- IMPORTANT SAFETY INFORMATION 2
- CONTENTS 3
- CHANGING YOUR SYSTEM SETUP 27 4
- TROUBLESHOOTING 32 4
- CARE AND MAINTENANCE 35 4
- INTRODUCTION 5
- System overview 6
- Control 6
- Control frame overview 8
- Click pad overview 9
- System updates 10
- Registering your product 10
- BASIC SYSTEM OPERATION 11
- ASIC SYSTEM OPERATION 12
- Channel 13
- CONTROLLING YOUR SOURCES 14
- Selecting source controls 15
- Highlighted function 15
- Entering channel numbers 16
- Channel number 16
- ONTROLLING YOUR SOURCES 17
- SPECIAL FUNCTIONS 18
- USING THE iPOD SOURCE 19
- CONTROL CONSOLE OVERVIEW 20
- USING THE USB SOURCE 21
- Play Bose 24
- demonstration 24
- Program Language 25
- Channel Number 25
- Control Frame Sounds 25
- Video Settings 25
- Motion Smoothing 26
- Restore Original Settings 26
- Automatic Off 26
- CHANGING YOUR SYSTEM SETUP 27
- HANGING YOUR SYSTEM SETUP 28
- TROUBLESHOOTING 32
- Resetting the system 33
- Performing a system update 34
- Contacting customer service 34
- CARE AND MAINTENANCE 35
- ARE AND MAINTENANCE 36
- Licensing information 38
- Product data logger 39
Summary of Contents
©2012 Bose Corporation, The Mountain,Framingham, MA 01701-9168 USAAM353022 Rev.01Operating GuideGuía del usuarioGuide d’utilisationVIDEOWAVE® II ENTER
10INTRODUCTIONEnglishTAB 6TAB 8 TAB 7 TAB 3TAB 5 TAB 2TAB 4System updatesThe Unify® intelligent integration system represents the best way we know how
11TAB 5TAB 4TAB 6TAB 8TAB 7English TAB 3TAB 2BASIC SYSTEM OPERATIONTurning the system on/offPress the power button on the remote to start the system.
12BASIC SYSTEM OPERATIONEnglishTAB 6TAB 8 TAB 7 TAB 3TAB 5 TAB 2TAB 4Selecting a sourceFrom the SOURCE menu, you can select any of your system sources
13BASIC SYSTEM OPERATIONTAB 5TAB 4TAB 6TAB 8TAB 7English TAB 3TAB 2Controlling the volumePress volume plus (+) or minus (–) to raise or lower the volu
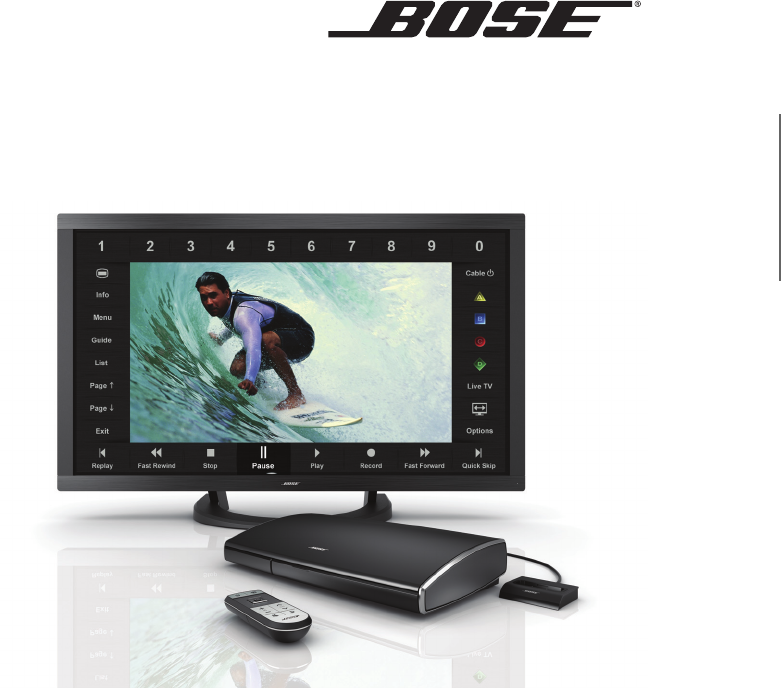
14EnglishTAB 6TAB 8 TAB 7 TAB 3TAB 5 TAB 2TAB 4CONTROLLING YOUR SOURCESControl frame overviewThe control frame consists of functions or controls used
15CONTROLLING YOUR SOURCESTAB 5TAB 4TAB 6TAB 8TAB 7English TAB 3TAB 2Selecting source controls1. Place your thumb anywhere on the click pad to activat
16CONTROLLING YOUR SOURCESEnglishTAB 6TAB 8 TAB 7 TAB 3TAB 5 TAB 2TAB 4Entering channel numbersThe numbers along the top of the control frame appear f
17CONTROLLING YOUR SOURCESTAB 5TAB 4TAB 6TAB 8TAB 7English TAB 3TAB 2Interacting with source guides and menusMany cable boxes, satellite receivers, an
18EnglishTAB 6TAB 8 TAB 7 TAB 3TAB 5 TAB 2TAB 4SPECIAL FUNCTIONSChanging the image viewSelect the image view control in the control frame to display a
19TAB 5TAB 4TAB 6TAB 8TAB 7English TAB 3TAB 2USING THE iPOD SOURCESelecting the iPod source1. Please be sure to dock your iPod. It will not appear in
2EnglishTAB 6TAB 8 TAB 7 TAB 3TAB 5 TAB 2TAB 4IMPORTANT SAFETY INFORMATIONPlease review the important safety information in your VideoWave® Entertainm
20EnglishTAB 6TAB 8 TAB 7 TAB 3TAB 5 TAB 2TAB 4CONTROL CONSOLE OVERVIEWPower lightIndicates system status. Refer to “Control console power light” on p
21TAB 5TAB 4TAB 6TAB 8TAB 7English TAB 3TAB 2USING THE USB SOURCEViewing photosPhoto files in a .jpg or .jpeg format can be displayed from a USB flash
22EnglishTAB 6TAB 8 TAB 7 TAB 3TAB 5 TAB 2TAB 4USING THE FRONT ANALOG A/V AND HDMI™ INPUTSConnecting to the front analog A/V inputsThe front analog A/
23TAB 5TAB 4TAB 6TAB 8TAB 7English TAB 3TAB 2CHANGING SOURCE AND SYSTEM OPTIONSThis section describes optional settings which affect operation of the
24CHANGING SOURCE AND SYSTEM OPTIONSEnglishTAB 6TAB 8 TAB 7 TAB 3TAB 5 TAB 2TAB 4Changing settingsThe OPTIONS menu allows you to change source-related
25CHANGING SOURCE AND SYSTEM OPTIONSTAB 5TAB 4TAB 6TAB 8TAB 7English TAB 3TAB 2Program LanguageSelects an alternate audio track, such as a Secondary A
26CHANGING SOURCE AND SYSTEM OPTIONSEnglishTAB 6TAB 8 TAB 7 TAB 3TAB 5 TAB 2TAB 4Gamma and color adjustmentsNote: We recommend that these adjustments
27TAB 5TAB 4TAB 6TAB 8TAB 7English TAB 3TAB 2CHANGING YOUR SYSTEM SETUPUnify® system overviewThe intelligent integration system guides you through the
28CHANGING YOUR SYSTEM SETUPEnglishTAB 6TAB 8 TAB 7 TAB 3TAB 5 TAB 2TAB 4Source setupA setup function will appear in the menu for each connected devic
29CHANGING YOUR SYSTEM SETUPTAB 5TAB 4TAB 6TAB 8TAB 7English TAB 3TAB 2Customizing the control frameThis function allows you to choose which controls
CONTENTS3TAB 5TAB 4TAB 6TAB 8TAB 7English TAB 3TAB 2INTRODUCTION 5Welcome . . . . . . . . . . . . . . . . . . . . . . . . . . . . . . . 5Product Ove
30CHANGING YOUR SYSTEM SETUPEnglishTAB 6TAB 8 TAB 7 TAB 3TAB 5 TAB 2TAB 4Installing the IR emitterIn order to control external sources like a set-top
31CHANGING YOUR SYSTEM SETUPTAB 5TAB 4TAB 6TAB 8TAB 7English TAB 3TAB 2Controlling the system using a third-party remoteA third-party remote, such as
32EnglishTAB 6TAB 8 TAB 7 TAB 3TAB 5 TAB 2TAB 4TROUBLESHOOTINGTroubleshooting tableProblem What to doThe system is not responding to initial operation
33TROUBLESHOOTINGTAB 5TAB 4TAB 6TAB 8TAB 7English TAB 3TAB 2Note: When listening to audio sources like iPod, the system will automatically enter scree
34TROUBLESHOOTINGEnglishTAB 6TAB 8 TAB 7 TAB 3TAB 5 TAB 2TAB 4Performing a system updateBy using a computer with an Internet connection, system softwa
35TAB 5TAB 4TAB 6TAB 8TAB 7English TAB 3TAB 2CARE AND MAINTENANCEReplacing the batteriesA low-battery message appears on the monitor when the remote b
36CARE AND MAINTENANCEEnglishTAB 6TAB 8 TAB 7 TAB 3TAB 5 TAB 2TAB 4WARNING: To avoid the risk of electric shock, make sure your hands are dry before u
37CARE AND MAINTENANCETAB 5TAB 4TAB 6TAB 8TAB 7English TAB 3TAB 2Limited warrantyYour VideoWave® entertainment system is covered by a limited warranty
38CARE AND MAINTENANCEEnglishTAB 6TAB 8 TAB 7 TAB 3TAB 5 TAB 2TAB 4“Made for iPod,” and “Made for iPhone,” mean that an electronic accessory has been
39CARE AND MAINTENANCETAB 5TAB 4TAB 6TAB 8TAB 7English TAB 3TAB 2Product data loggerThe VideoWave® system features a product data logger that is desig
4EnglishTAB 6TAB 8 TAB 7 TAB 3TAB 5 TAB 2TAB 4Motion Smoothing . . . . . . . . . . . . . . . . . . . . . . 26Restore Original Settings . . . . .
©2012 Bose Corporation, The Mountain,Framingham, MA 01701-9168 USAAM353022 Rev.01Operating GuideGuía del usuarioGuide d’utilisationVIDEOWAVE® ENTERTAI
5TAB 5TAB 4TAB 6TAB 8TAB 7English TAB 3TAB 2INTRODUCTIONWelcomeThank you for choosing the Bose® VideoWave® entertainment system for your home.By now,
6INTRODUCTIONEnglishTAB 6TAB 8 TAB 7 TAB 3TAB 5 TAB 2TAB 4System overviewThe VideoWave® entertainment system offers a unique approach to controlling e
7INTRODUCTIONTAB 5TAB 4TAB 6TAB 8TAB 7English TAB 3TAB 2Bose® click pad remote control overviewSource selectionSelects connected devices from the sour
8INTRODUCTIONEnglishTAB 6TAB 8 TAB 7 TAB 3TAB 5 TAB 2TAB 4Control frame overviewThe control frame consists of functions or controls used by the source
9INTRODUCTIONTAB 5TAB 4TAB 6TAB 8TAB 7English TAB 3TAB 2Click pad overview1TOUCHPlace your thumb on the click pad to see the control frame.2GLIDEGlide
© 2020, manymanuals.com. All rights reserved. | 0.447 s |
 Manymanuals.com
 Manymanuals.de
 Manymanuals.fr
 Manymanuals.it
 Manymanuals.pl
 Manymanuals.cz
 Manymanuals.es
 Manymanuals-pt.com
Comments to this Manuals